| Valentine’s Day Concrete DIY |
Now I could start this post off with some silly joke about setting your love in stone (see what I did here?), but I really shouldn’t. Instead we’re going to focus on an awesome way to celebrate Valentine’s Day this year, with some concrete DIY. I know, I know, didn’t we read a DIY post the other day? Yes you did (no apologies here). But that’s the beauty of concrete, it’s so versatile and I want to show you how to make the most of it for this season of love.
So let’s give it a shot and do something simple yet sweet like little concrete hearts. Easy as! All you need is:
- – OneMix Rapid Set (or if you want a smoother finished we suggest OneMix Mortar)
- – Heart shaped silicone moulds (you can get these in so many types and sizes, pick your favourite!)
- – Disposable cup/container
- – Water
- – Something to stir with
- – Something to smooth the moulds (I use a paddle pop stick)
- – Optional: sandpaper
- – Optional: paint & paintbrushes
- – Optional: necklace chain & small loop screw
- – Optional: small but strong magnets & super glue
Make sure you have everything ready to go before you mix your concrete; it sets quickly so you need to be prepared! I’d probably even premeasure out the water you need beforehand, just so things go a bit smoother.
Step 1: Safety
We’re only working in little quantities but we still need to be safe, make sure you’re wearing gloves throughout this process and safety glasses! These can be taken off once you’ve put them aside to set.
Step 2: Quantity
So for our moulds we’ll probably only need ½ cup of Rapid Set, but that entirely depends on how many you want to make and the size of your hearts. You’ll have to be your own judge. So work on the idea that for every 1/2cup of Rapid Set we need just over 1 tablespoon of water, or 15.88ml if you want to be really precise.
Step 3: Mixing & Pouring
Once you add the water to the Rapid Set you need to stir as fast as possible to mix it all together. Be aware it can start to set within 15minutes, so be quick.
Time to get pouring into your moulds! Before they set use your paddle pop stick to flatten off the backs if needed. Then we set aside to dry for approximately an hour.

Step 4: Finishing touches!
Now they’re all dry you can just pop them out of the moulds. Use the sandpaper if needed to remove any rough or sharp edges. Ta-da! Cute-as concrete valentines.
From here it’s totally up to you how you want to use them. Maybe paint and stamp them with cute messages to hand out to your special someone, friends or family.
 If you want to be really tricky you can either add magnets to the back while they’re drying for use on the fridge (or super glue them on after if you prefer). If you partner this with a nice photo or two it’s a great little gift, shows a lot of thought.
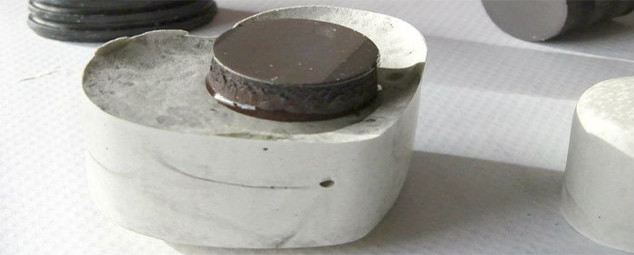
Or even just add in a little loop screw (make sure this has extra concrete on top to keep it in place) to make a necklace out of. Just add the chain through the loop when they’re completely dry.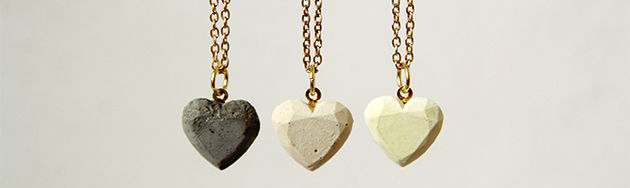
Whether it’s a gift to your special someone, yourself (people really need to love themselves more) or just for a bit of fun, I hope you give our concrete hearts a trial. Send in some photos if you do, I’d love to see!